")

Creating a smart home doesn’t have to cost a fortune or require an engineering degree. Whether you’re a renter in a studio apartment or a homeowner with a growing family, this guide will help you build a powerful and affordable smart home step-by-step, with real product suggestions, ecosystem tips, and money-saving strategies.
Phase 1: Start with the Essentials (Budget: $100-$200)
1. Smart Speakers & Voice Assistants
Choose your smart home ecosystem: Amazon Alexa, Google Assistant, or Apple HomeKit.
Amazon Echo Dot (5th Gen) – ~$30
Google Nest Mini – ~$30
Apple HomePod Mini – ~$90
Tip: Alexa and Google are more budget-friendly and compatible with a wider range of third-party devices.
Recommended Start: Amazon Alexa if you’re budget-conscious and want wide device support.
2. Smart Plugs
These let you control lamps, fans, coffee makers, and more.
Kasa Smart Plug Mini (2-pack) – ~$20 (Amazon Alexa & Google compatible)
Meross Smart Plug Mini (HomeKit compatible) – ~$25
Pro Tip: Look for ENERGY STAR rated models to save on electricity.
3. Smart Bulbs
Set the mood and save energy with voice-controlled lighting.
Wyze Color Bulbs (2-pack) – ~$25 (Alexa & Google)
Sengled Smart Bulbs – ~$10 each (budget-friendly and Alexa-compatible)
Rental Tip: Smart bulbs are great because you don’t need to mess with wiring.
Phase 2: Automate & Secure (Budget: $200-$400)
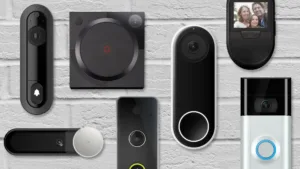
4. Smart Security Cameras
Peace of mind without subscription traps.
Wyze Cam v3 – ~$36 (wired, weatherproof, free local storage)
Eufy Security Solo IndoorCam C24 – ~$40 (local storage, HomeKit compatible)
Pro Tip: Stick to cameras with local storage if you want to avoid ongoing fees.
5. Smart Door Sensors & Motion Detectors
Create automations like turning on lights when you enter a room.
Aqara Door & Window Sensor – ~$18 (requires Aqara Hub)
Ring Alarm Contact Sensor (2nd Gen) – ~$20 (Alexa compatible)
Troubleshooting: If sensors don’t respond, check Wi-Fi or replace CR2032 battery.
6. Smart Thermostats (Optional)
Significant energy savings over time.
Google Nest Thermostat (2020) – ~$130 (easy DIY install, rebates available)
Amazon Smart Thermostat – ~$80 (Alexa-only)
Money Tip: Check your power company for rebates—many offer $50-$100 back.
Phase 3: Expand & Customize (Budget: $100-$300+)
7. Smart Locks
Secure entry with phone control and automations.
Wyze Lock – ~$90
Level Bolt (invisible design) – ~$130 (HomeKit compatible)
Renter Tip: Choose locks that retrofit onto existing deadbolts.
8. Smart Light Switches
Great for controlling overhead lights via voice.
TP-Link Kasa Smart Dimmer Switch – ~$20
Lutron Caseta Smart Switch Starter Kit – ~$100 (HomeKit, pro-grade reliability)
Note: Requires neutral wire unless you use a battery-powered switch like Lutron Pico.
9. Smart Hubs (For Expansion)
If you’re adding Zigbee/Z-Wave devices:
Aeotec SmartThings Hub – ~$120
Aqara Hub M2 – ~$60 (HomeKit compatible)
Money-Saving Tips
Buy refurbished: Check Amazon Renewed, eBay Certified Refurbished.
Wait for sales: Best times are Prime Day, Black Friday, and back-to-school season.
Bundle kits: Brands like Wyze, Kasa, and Aqara offer discounted starter kits.
Use rewards: Use cashback apps like Rakuten or credit card points.
Ecosystem Compatibility Cheatsheet
| Device Type | Alexa | Google Assistant | Apple HomeKit |
|---|---|---|---|
| Kasa Smart Plug | ✅ | ✅ | ❌ |
| Wyze Cam | ✅ | ✅ | ❌ |
| Meross Plug | ✅ | ✅ | ✅ |
| Aqara Sensors | ✅ (via hub) | ✅ (via hub) | ✅ (via hub) |
| Nest Thermostat | ❌ | ✅ | ✅ (limited) |
Advice: Stick to one ecosystem unless you’re comfortable managing integrations via Home Assistant or Matter (coming soon on many new devices).
Setup & Troubleshooting Tips
Internet Speed: Minimum 20 Mbps is ideal for stable smart home operation.
Router Placement: Keep your router central and away from thick walls.
Naming Devices: Use clear names like “Living Room Lamp” instead of “Plug 1.”
Power Cycling: If a device misbehaves, unplug it and reconnect after 10 seconds.
Reset Method: Always read the manual; most devices use long press to reset.
Security & Privacy Must-Knows
Create guest Wi-Fi for smart devices.
Change default passwords immediately.
Use 2FA on your smart home accounts.
Disable unused features, like remote access if you don’t need it.
Regular firmware updates keep your devices safe.
Final Thoughts
You don’t need to go all-in from day one. Start small, expand steadily, and choose devices that offer real utility for your lifestyle. By staying within a clear budget and focusing on ecosystem compatibility, you’ll build a future-proof smart home that grows with you.
Want to splurge later? Add smart blinds, garage controllers, or home energy monitors. But for now, enjoy your intelligent, connected life—on a smart budget.